Sometimes ago it was Yahoo mail you see everywhere by everyone but sincerely Google Gmail has surpassed all, including Microsoft mail, as with billions of users as well.
One thing i like about Google Gmail, is the mobile (user) friendly expirience done on the Gmail site, no matter how poor or small your device/browser maybe, Gmail is suited to the best look, design and all, you will get the information you need easily.
10 Gmail (Google) Features And Tricks You May Not Know About
Here i will be writing with details a list of ten Gmail features and of course tricks you may just not know about, this will in return be helpful for most people using Gmail, because am sure most of us just think/do is to check our mail only but do not know some things are even more possible with this platform. Though you may have more you know about; as i may not mention all, you can drop yours via the comment box... it will greatly be appreciated.1. Get Notifications for Specific Labels only (Using The Gmail App)
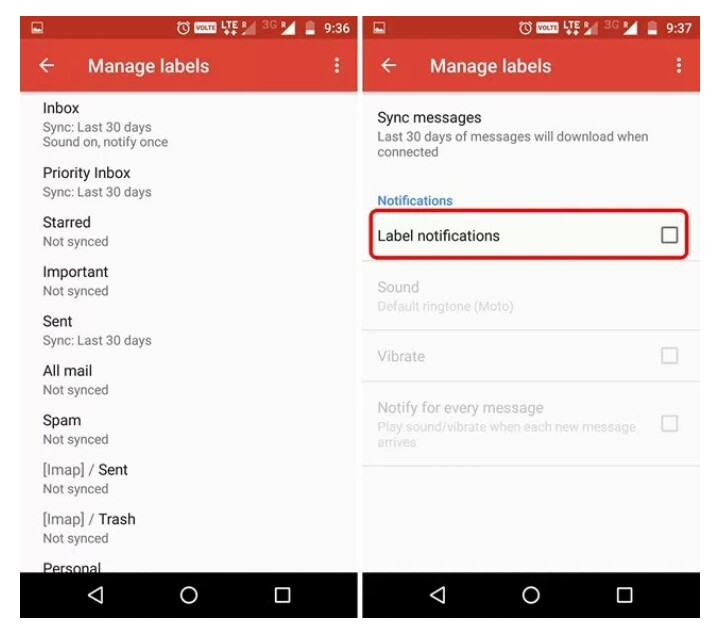
If you receive a lot of emails in a day, notifications from the Gmail app on your iPhone/iPad or Android device can be quite annoying. Thankfully, in the Gmail app, you can make sure to receive notifications from only specific labels. This way, you can make sure you can disable the notifications from labels like Promotions, Spam etc.To do this on Android, head to Settings in the Gmail app and tap on “Manage Label“. Then, you can go into different labels and enable or disable “Label Notifications“.
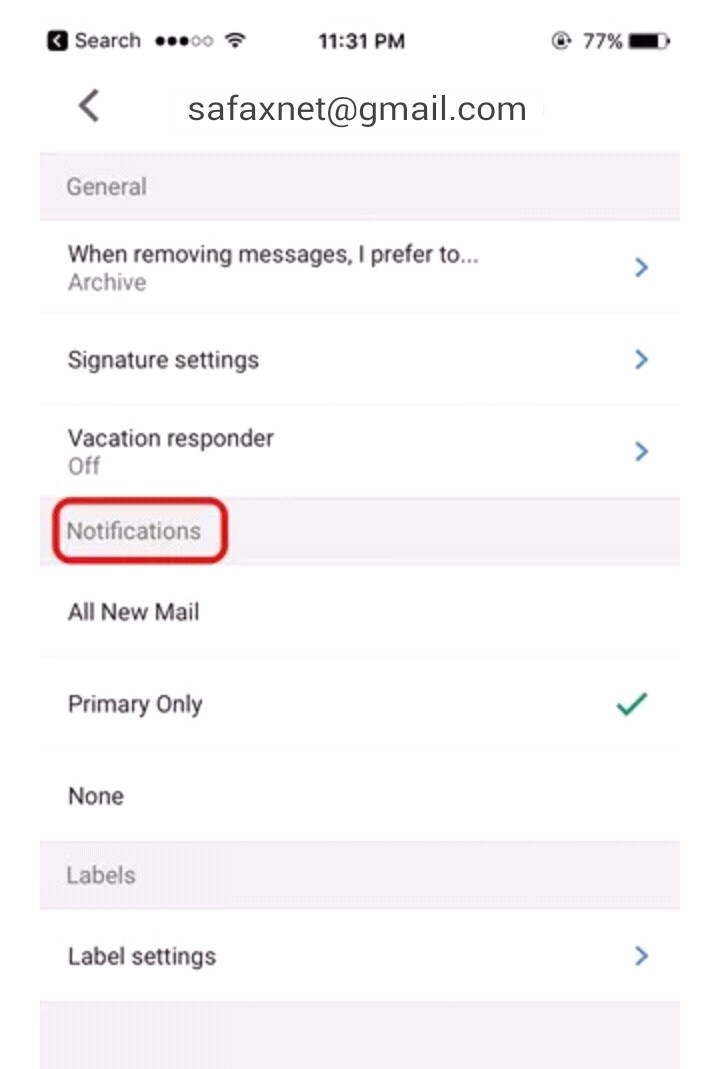
On an iPhone or iPad, you can select if you want notifications for “All New Mail”, “Primary Only” or “None”.
2. Create Disposable Email Aliases for Sign Ups
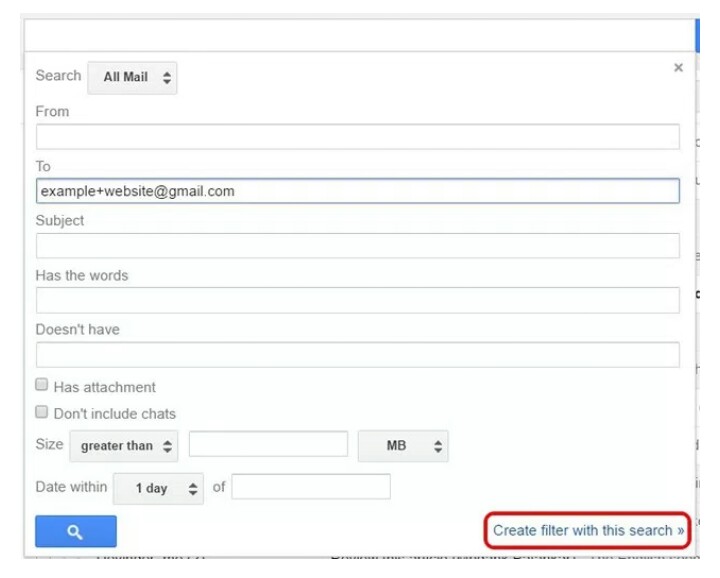
While you can set up email aliases to sign up to different services and websites, there’s an even simpler way to create disposable email addresses and make sure emails from sign ups land up in spam. Well, it’s easy, if your email id is “[email protected]“, you can just use “[email protected]” as your disposable email address. Gmail does not consider any text after “+” as email addresses, so when you get an email on [email protected], it’ll land up in [email protected].So, when you’ve signed up to a service you don’t want to receive emails from, you can set up a filter that makes sure emails to the disposable address automatically get archived.
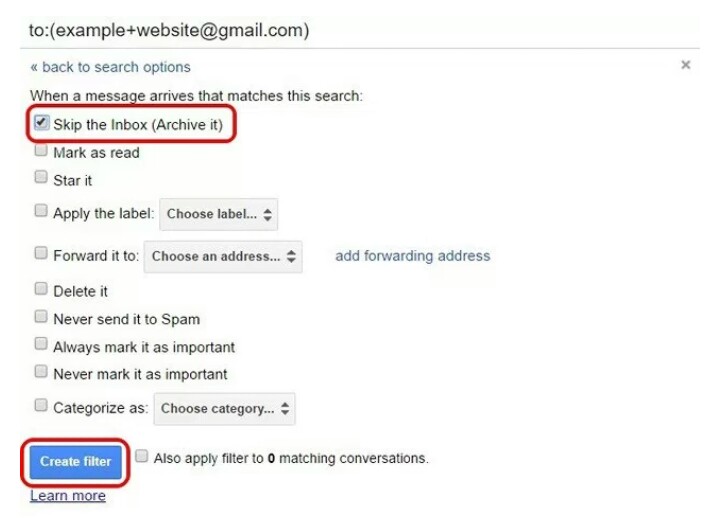
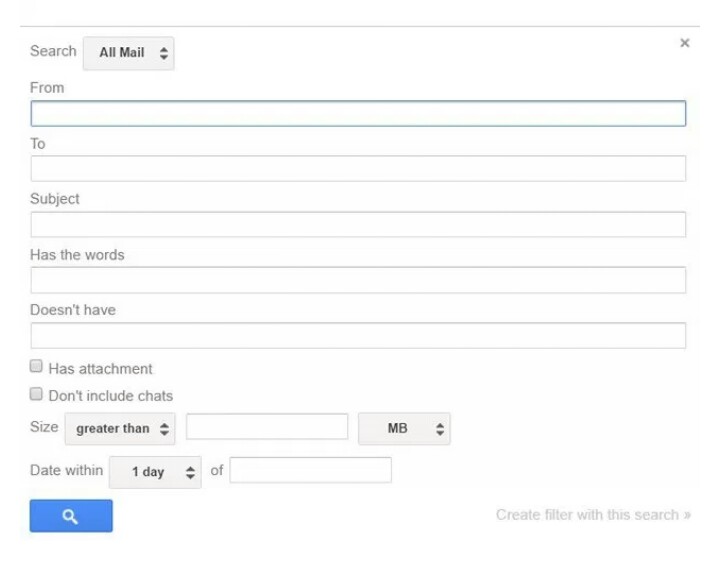
All you need to do, is hit the drop-down button in the Gmail search bar. In the advanced search page, type in the [email protected] address in the “To” section and then, click on the “Create filter with this search” option.
In the next page, you can choose the option to “Skip the Inbox (Archive it)” or “Delete it” and click on “Create filter“. That is it, now whenever you receive an email on the disposable address, it will be automatically deleted or archived.
3. To Enable Undo Send & Set Cancellation Period
There are times when we are typing an email and accidentally hit the send button. While that’s fine for informal emails, it’s bad if it happens when you are sending an important formal mail. Thankfully, Gmail includes a very cool “Undo Send” feature, which as you might have guessed, lets you revoke sent messages.To enable Undo Send, head to Gmail Settings and in the General tab, find the “Undo Send” option and enable it. Here, you can also set the time period for cancellation. You can set it to 5, 10, 20 or 3 seconds.
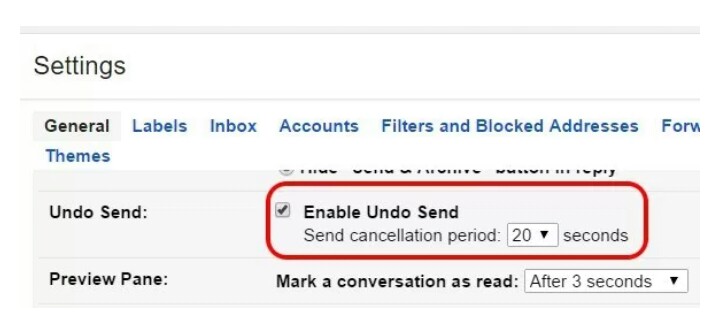
Once done, save the changes and send a test email. Alongside the sending message alert on top, you will find an “Undo” button, which you can click on to stop the message.

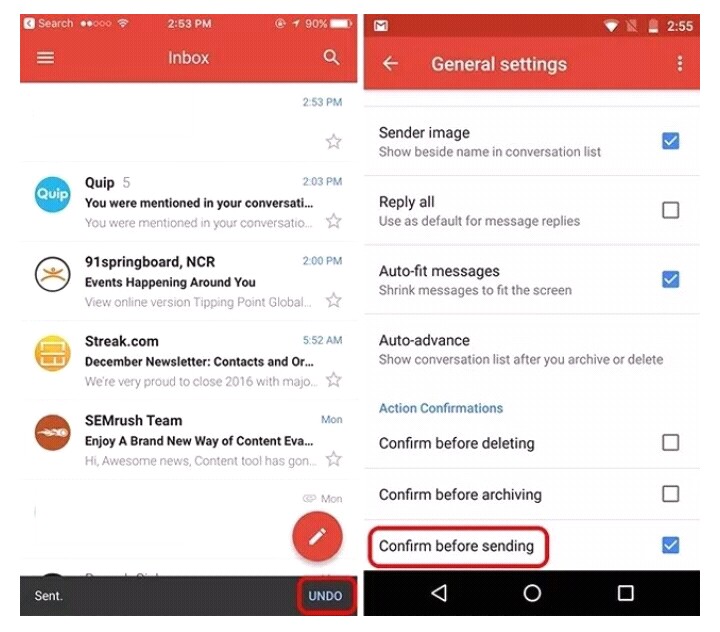
The Undo Send feature is also available in the iOS Gmail app. However, you don’t need to enable it or set anything up. When you send an email from the Gmail app on an iPhone or iPad, you see an undo option at the bottom. On the other hand, the Gmail app on Android surprisingly still does not feature the undo option but you can enable the “Confirm before sending” option in “General Settings”.
4. You Can Set Up A Mail Delegation
Not many people know about Gmail’s Mail Delegation feature, which is shame because it’s really handy. The feature lets you grant access to your Gmail account to multiple people, without you having to share your password or other details. Plus, the delegates only get limited access to your account. A delegate can send or reply to emails sent by you, read your emails, delete emails and manage contacts. However, a delegate can’t change your Gmail password, account settings or chat with anyone.To add a delegate, head over to Gmail Settings. Then, head to the “Account and Import” tab and in the “Grant access to your account” section, click on “Add another account“.
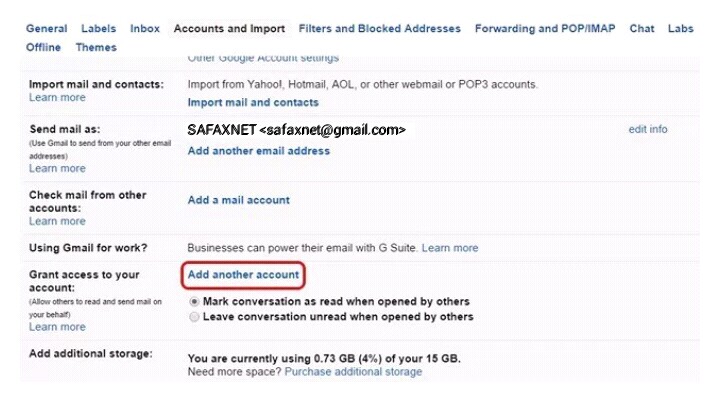
Then, you will have to enter the email address of the person you want to add as delegate. After you’ve entered, click on “Next Step“.

Then, click on “Send email to grant access“, after which an email will be sent to the email address you entered. The recipient will have to accept the invitation from the email. Once done, it should take a few hours before the delegate can access your account.

Note: Gmail users can only add 10 delegates but if you are using a Google apps Gmail account, you can add 25 delegates but these delegates can be only from the same organization as you. Also, some companies disable the delegation feature.
5. It Can Enable Preview Pane
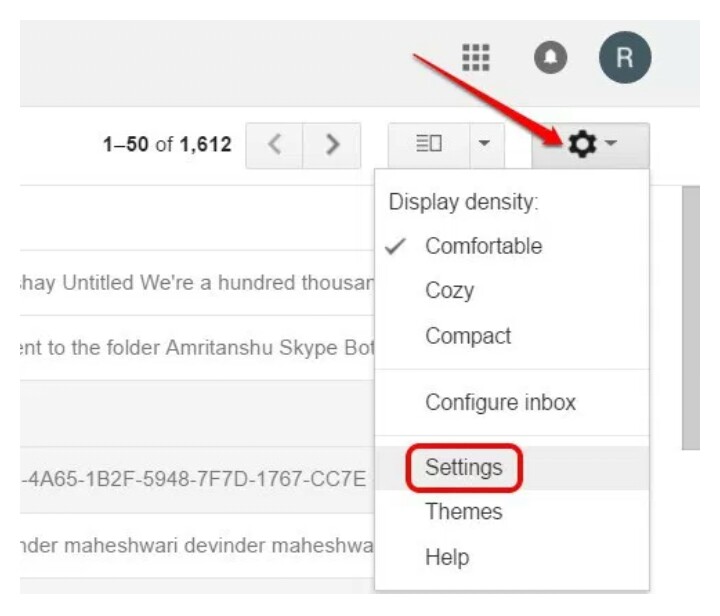
Preview pane is a much loved feature in Outlook but not many people know that the feature is available in Gmail as well. Preview Pane brings an additional pane to your Inbox, so that you can view your emails right in the inbox. This is certainly handy because if you want to shuffle through multiple emails in Gmail, you will have to open an email, go back and then open the next one. Well, that changes with Preview Pane.To enable the Preview Pane, head to Gmail settings by hitting the setting cog icon on the top right and clicking on “Settings“.
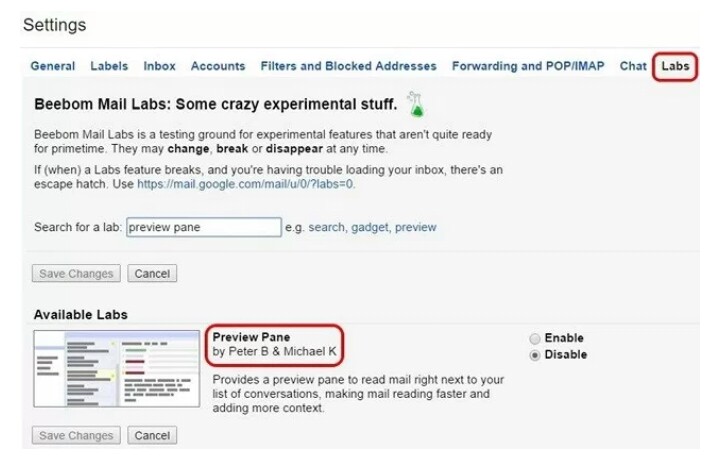
Here, go to the “Labs” tab and scroll down below to find or search for the “Preview Pane” option. Just select “Enable” and click on “Save Changes“.
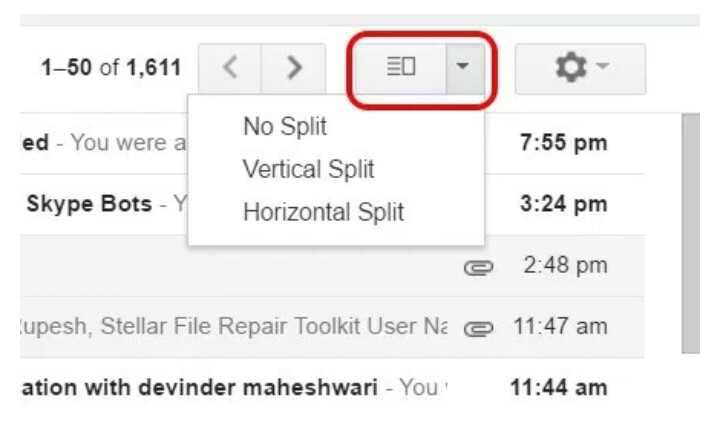
Then, Gmail will reload and you will find a new icon next to the Settings icon. You can click on its drop-down menu button to choose from “Vertical Split” or “Horizontal Split“.
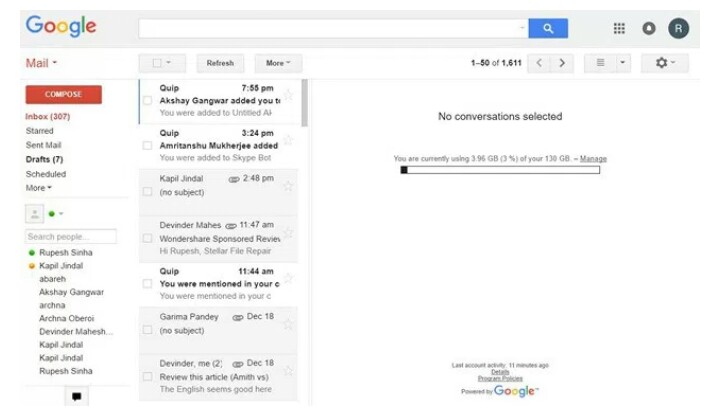
I’ll recommend you to use the vertical split option because that lets you see all the emails you’d normally see, while also letting you check all your emails.
6. Track Emails and Check Who’s Tracking You
There are times when you send out an important email but you’re worried if the email has been read or if it landed in spam. Well, worry no more, because there are several extensions for Gmail that let you track emails aka bring you read receipts.If you just want to keep a check on the emails you’ve sent, you can install the Mailtrack extension, which lets you track unlimited emails in the free version. You can just install the extension, give it the permissions and you are good to go. It works automatically and you don’t have to do anything. I also like the checkmark icons on your sent emails, which tell you if the email has been read or not. You get notifications when your email is read. The only issh with Mailtrack is the fact that it does not let you disable tracking for specific emails.

If you’d like more features like the ability to track the links inside emails, more statistics, then you can check out other extensions like Bananatag Email Tracking, Boomerang etc.
Apart from tracking your emails, you can also check the emails which have any tracking code enabled in them. For this, you can use the Uglymail extension, which shows an eye icon besides emails that have some kind of tracking enabled. It’s not foolproof, so don’t trust the extension blindly. However, it’s the best solution to know if anyone’s tracking you.

7. Can Send Encrypted Emails
If you happen to use Gmail to exchange a lot of sensitive data and conversations, you should make sure that there’s no way anyone can snoop in. Well, that’s where the SecureGmail extension comes into play. This extension lets you send encrypted emails from Gmail.First, download the extension from the Chrome Web Store. Once done, just open up Gmail or refresh it if it’s already open. Then, you will see a lock icon alongside the Compose button. Just click on it to start composing an encrypted email.
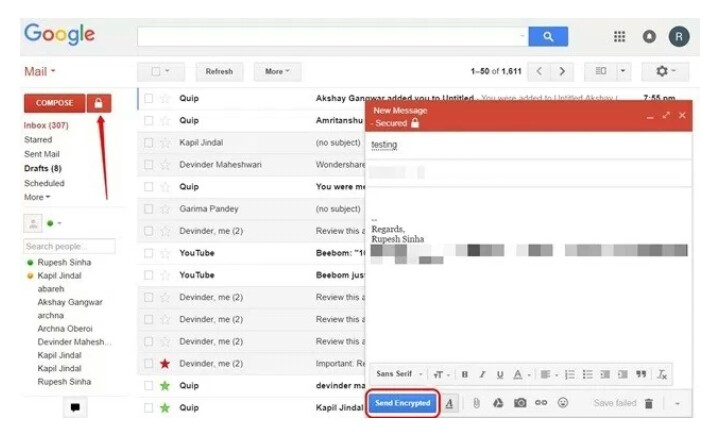
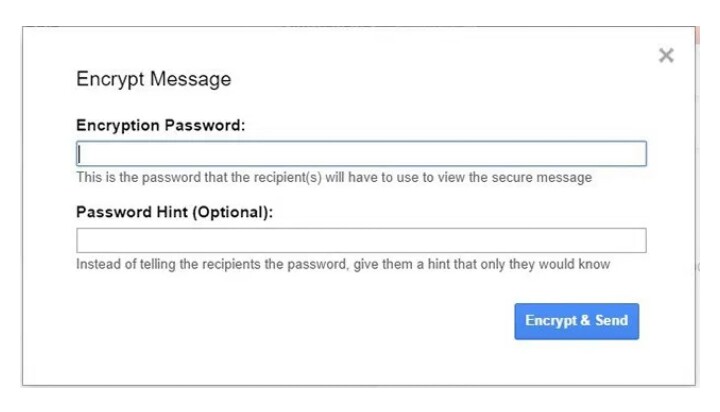
Once done, the email will be sent and the recipient will have to enter the password to open the email.
8. Send Self-Destructing Emails
Snapchat’s self-destructing messages is a great feature and if you love it, there’s a way to get that in Gmail as well. This should certainly be handy for emails that you don’t want anyone to be saved. To send self-destructing emails, you can use the Snapmail extension (download here).After you have installed the extension, you will find a “Snapmail” button alongside the usual send button in Gmail’s compose window. Now, all you need to do is type out an email and hit the Snapmail button to send it.
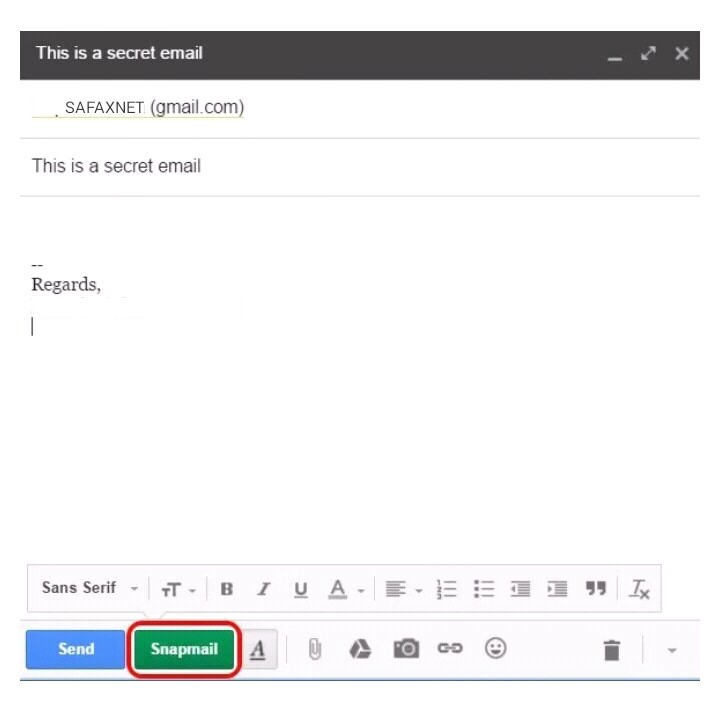
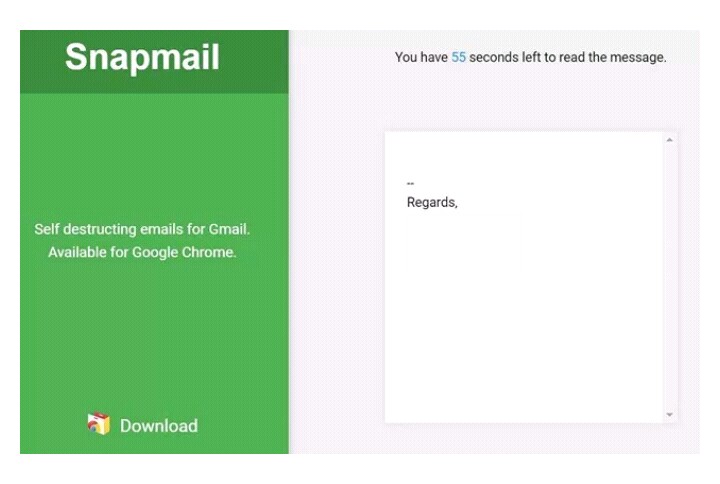
The recipient will receive your secret message via a link. Once the recipient opens the link, the 60-second countdown will begin, after which the message will be deleted forever. Now, that’s cool!
9. You Can Use Different Colored Stars
I’m sure you are aware of the ability to star emails in Gmail but chances are, you do not know the fact that there are more stars other than the yellow star. Yes, that’s right! To enable more stars in Gmail, you can head to Gmail Settings. Here, scroll down in the “General” tab to find the “Stars” section. Then, you can just drag and drop different stars to the “In Use” section to enable them. When you are done, just hit the “Save Changes” button at the bottom.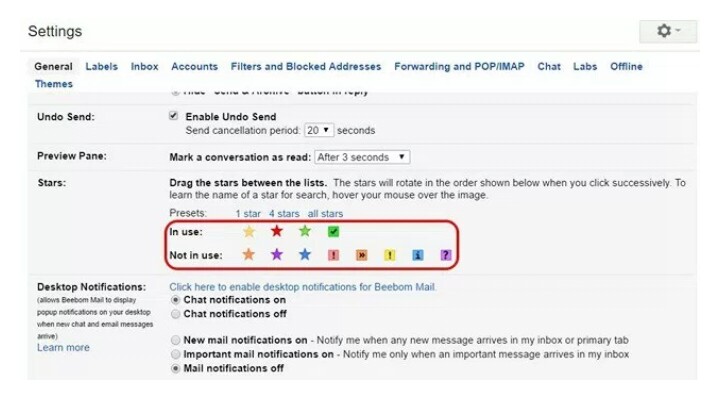
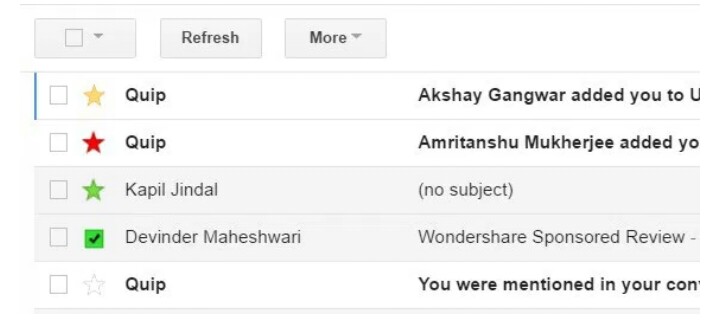
Now, you can click on the star icon next to emails multiple times to get the different stars. You can use different colored stars to mark emails as important, urgent or something you are done with. For instance, you can use the red star for urgent emails, yellow star for important emails and green stars for emails you are done with, but want them in the “Starred” section.
10. Advanced Gmail Search
Gmail features some great search capabilities, which is certainly not a surprise, considering it’s a Google offering. You can search for emails in Gmail through size, date, file name of attachments, read or unread state, people, content etc. For instance, you can type “larger: 5 MB” to search for emails that more than 5 MB in size. You can type “filename:pdf” to search for PDF files with the entered file name. These search parameters even work on the Gmail app, which is great.
You can hit the drop-down button in the search bar to open up a more advanced search option. Here, you can search based on who the email is from, the words in the email, attachments etc. You can even create a filter with this search.
READ ALSO:- How To Backup And Find The Apk File Of Any App On Android
So thats all, i hope you will find something new you never knew about Gmail here, if you got any other features or tips that was not included above, kindly include yours via the comment box.

.jpg)

No comments:
Post a Comment